E3 Data Protection Guide
With the E3 data protection solution, your computers are backed up every night to E3 hardware. Backups are then securely and automatically copied to the cloud to ensure that your computers are always protected.
Note: The E3 data protection solution provides the same functionality as E2 data protection, but with updated hardware. Unless otherwise stated, information in this guide applies to both E3 and E2 data protection.
E3s and security
To protect your data from malicious threats, the Microsoft Defender Antivirus program is enabled on all E3 appliances. Microsoft Defender Antivirus brings together machine learning, big-data analysis and in-depth threat resistance research to protect your E3 appliance.
To ensure protection from the latest security vulnerabilities, Microsoft Defender Antivirus is updated automatically on E3s every Sunday morning between 5 AM and 8 AM. You do not have to trigger updates manually.
IMPORTANT: During the maintenance window on Sunday mornings from 5 AM to 8 AM, you cannot back up data to or restore data from an E3 appliance.
To eliminate possible entry points for malware programs and bad actors, services which are not required for E3 data protection are disabled on E3 appliances. The only services running on the E3 are Carbonite Server Director services and important Windows services.
All ports on E3 appliances are locked down except for the following ports which are required for E3 functionality:
-
Backup - 2546, 807 (Inbound)
-
Replication - 2547, 12547 (Outbound)
-
File server / Package downloads - 443, 80 (Outbound)
-
BeyondTrust (Bomgar) - 443, 80 (Outbound)
-
RDP - 3389 (Inbound)
Get started with E3
Your E3 hardware is shipped to you after you order the data protection solution. After you receive the shipment and get an Ethernet cable, you can set up E3 data protection using the following steps.
Step 1. Set up your E3 hardware
| To successfully complete the setup, the E3 requires access to an internal or Internet NTP (time) server. For assistance, please contact Support at 1-866-855-9555. |
To set up your E3 hardware:
-
Connect the power cord to the power connector on the back of the E3 hardware, and plug it into a power outlet.
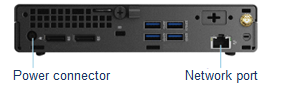
Note: E3 hardware is shown in this picture. The power connector and network port are in different locations on E2 hardware.
-
Connect an Ethernet cable (not provided) to the network port on the back of the E3 hardware. Connect it to the same network as the servers you want to back up.
-
Press the Power button on the front of the E3.
The initial E3 configuration begins. Depending on the speed of your internet connection, the initial configuration can take some time. Please do not unplug the hardware during this time.
Step 2. Set your Portal password
You must set a password for signing in to the Portal website. You will use Portal to set up and manage your backups and restores.
To set your Portal password:
-
Find the email for setting your Portal password. The email was sent to the address you will use to sign in to Portal. Click Set My Password in the email.
-
On the web page for setting your password, enter your new password in the password boxes, and then click Set my password.
-
If a Take me to Portal button appears, click the button and sign in using your email address and new password.
If a message states that the code is no longer valid, click Forgot my password. Enter the email address, and click Submit. Find the new email for setting your Portal password, and follow these steps again.
Step 3. Download and install agent software
You must install agent software on every computer that you want to protect. For more detailed information, see Download and install agent software on a computer.
To download and install agent software:
-
In a web browser, go to the Portal website.
-
Sign in to Portal using your email address and password. For more information, see Sign in to Portal.
-
In the Tools section on the Dashboard, click Add computer.
-
In the Agent Downloader dialog box, follow the prompts to download an agent installer. Review the agent details to check that your operating system is supported, and click Download.
-
Run the installer on the computer that you want to protect.
Step 4. Set up backups for a computer
After installing agent software, you can set up backups. You must set up backups for every computer that you want to protect. For more detailed information, see Set up backups for a computer.
To set up backups for a computer:
-
In Portal, go to the What’s New section on the Dashboard.
-
Click Configure Now for the computer where you installed agent software.
If a message states that the appliance setup is still in progress, please wait and try to set up backups later. If the configuration doesn’t finish within 24 hours, please contact Support.
-
In the Automatically Configure an Agent box, enter a strong encryption password for your backup, and click Auto Configure.
IMPORTANT: Your encryption password is required for restoring your data, so be sure to store it somewhere safe.
-
If you have more than one E3, choose the E3 for your backups.
-
Click Configure automatically.
After setting up backups, you can monitor your backups and storage usage using Portal. See Monitor your backups and storage usage.