Restore a vSphere VM within minutes using Rapid VM Restore
Using Rapid VM Restore, you can restore a virtual machine (VM) to your vCenter or ESXi host within minutes.
In a vCenter, you can restore a VM using Rapid VM Restore and then migrate it to a second datastore to restore it permanently. This can be useful in a disaster recovery situation, where critical servers must be restored and available to users and applications as soon as possible. You can also restore a VM temporarily, to quickly verify that the VM backup can be restored.
On an ESXi host that is not managed by vCenter Server, you can restore a VM temporarily using Rapid VM Restore. Restoring a VM temporarily can be useful as a test, to quickly verify that a VM backup can be restored.
When you first restore a vSphere VM using Rapid VM Restore, disks from the selected VM backup are mounted as storage devices (virtual RDMs) on a VM for immediate access. While the VM runs, changes are written to a temporary datastore. At this stage, the VM requires a running Rapid VM Restore process, requires connections to the VRA and vault, and is intended for temporary use. The longer a VM runs using Rapid VM Restore, the more its performance will degrade and the more vault and VRA resources it will use.
After you migrate a restored VM to permanent storage in a vCenter, the VM does not require a running Rapid VM Restore process and is independent from the VRA and vault. We recommend migrating a VM to permanent storage as soon as possible after it is restored using Rapid VM Restore. See Migrate a vSphere VM restored using Rapid VM Restore to permanent storage. If the network connection to the VRA, vault or ESXi host is interrupted before a VM is migrated to permanent storage, VM data could be lost.
IMPORTANT: If the VRA is protecting a single ESXi host that is not managed by vCenter Server, you cannot restore a VM permanently using Rapid VM Restore. An ESXi server that is not part of a vCenter does not have the capabilities required to migrate VMs to permanent storage.
Notes:
-
Before a VM is restored using Rapid VM Restore, the VRA checks that sufficient storage space is available. If there is insufficient space, the restore fails and a message appears in the log file.
-
If you restore a template using Rapid VM Restore, it is restored as a running virtual machine and not as a template.
-
After you restore a VM from a crash-consistent backup, the VM may perform a disk check when it first starts.
-
We highly recommend backing up virtual machines (VMs) that are restored using Rapid VM Restore. See Best practice: Back up vSphere VMs restored using Rapid VM Restore.
-
Rapid VM Restore is available with vSphere Recovery Agent (VRA) version 8.80 or later. For complete requirements, see vSphere Rapid VM Restore and backup verification requirements.
To restore a vSphere VM within minutes using Rapid VM Restore:
-
On the navigation bar, click Computers.
A grid lists available computers.
-
Find the vSphere environment with the VM that you want to restore, and expand its view by clicking the row.
-
Click the Jobs tab.
-
Find the backup job with the VM that you want to restore, and click Restore in the job’s Select Action menu.
-
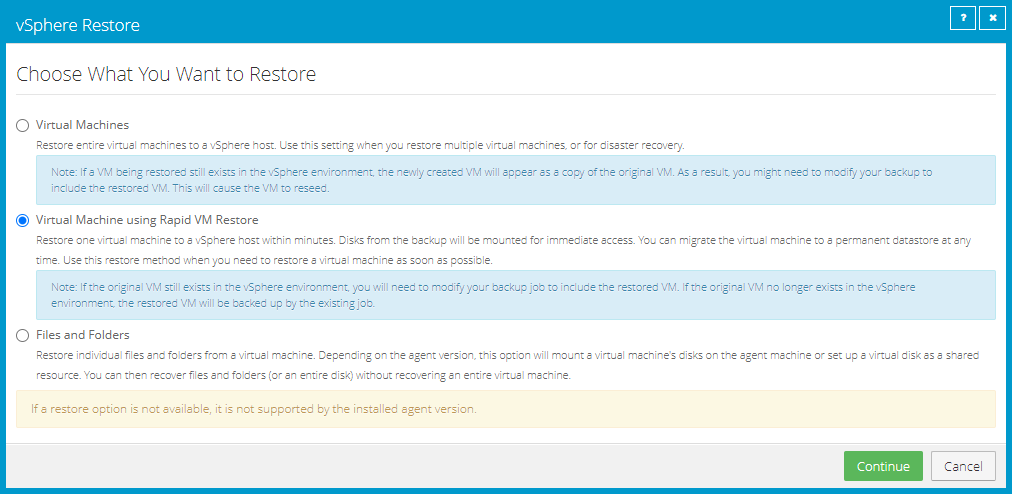
In the Choose What You Want to Restore dialog box, select Virtual Machine using Rapid VM Restore.
If the Virtual Machine using Rapid VM Restore option does not appear, this restore method is not available. This could occur with a VRA version earlier than 8.80, if backups are not available in a local vault that supports Rapid VM Restores, or if other requirements are not met. For complete requirements, see vSphere Rapid VM Restore and backup verification requirements.
-
Click Continue.
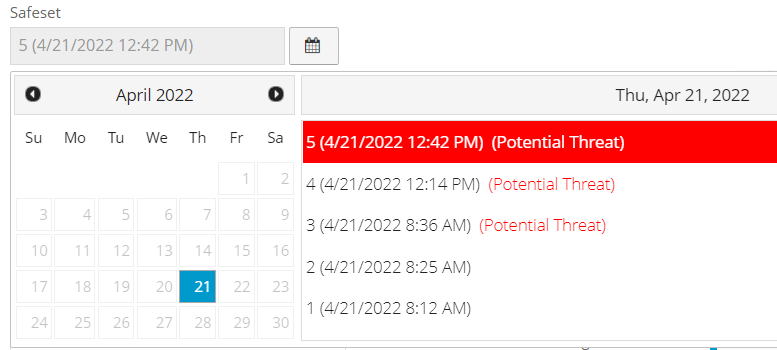
The Restore dialog box appears. If a potential ransomware threat was not detected in the job, the most recent safeset for the job appears in the Safeset box.
If a potential ransomware threat was detected when running the job, a calendar with a list of safesets appears. "Potential Threat" appears beside each safeset where a potential ransomware threat was detected.
Note: If you are restoring data as described in Restore data to a replacement computer or Restore data from another computer, "Potential Threat" does not appear for any safesets even if a potential threat was detected during a backup in the original vSphere environment.
-
To restore from an older safeset, if a calendar with a list of backups does not already appear, click the Browse Safesets button.
 In the calendar, click the date of the safeset from which you want to restore. To the right of the calendar, click the specific safeset from which you want to restore.
 -
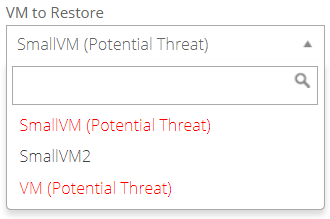
In the VM to Restore list, select the VM that you want to restore.
If a potential ransomware threat was detected on a VM, "Potential Threat" appears beside the VM name.
-
In the Encryption Password box, enter the data encryption password. To view the password hint, click the Hint button
 .
. -
In the Log Level Detail list, select the level of detail for job logging. For more information, see Log file options.
-
In the Restore Settings box, do the following:
-
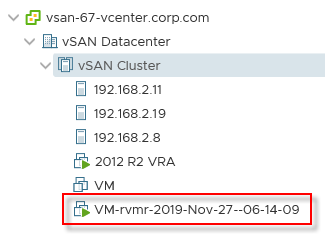
In the Restored VM Name box, type a name for the restored VM.
If you specify the name of a VM that already exists in the vSphere environment (e.g., the VM that was backed up), the restored VM will have the following name: VMname-rvmr-yyyy-Mon-dd--hh-mm-ss, where yyyy-Mon-dd--hh-mm-ss is the date and time when the VM was restored (e.g., VM-rvmr-2019-Nov-27--06-14-09).
-
In the Datastore list, select a datastore for writing changes while the VM is restored using Rapid VM Restore (i.e., while disks from the selected backup are mounted as storage devices).
If the VRA is protecting a vCenter and you later want to migrate the VM to permanent storage, do not choose the datastore that you want to use as permanent storage.
-
In the Destination Host list, select a host for running the restored VM.
If only one ESXi host is available, it is populated as the Destination host when you select a datastore.
If the VRA is protecting a vCenter and you later want to migrate the VM to permanent storage, select a host that can access the permanent datastore.
- Do one of the following:
To restore the VM with its power on, select the Power on the VM option.
To restore the VM powered off, clear the Power on the VM option.
You might want to restore the VM with its power off, for example, so you can verify or change the VM settings before powering it on.
-
Do one of the following:
-
To connect the VM to the network, select Connect to Network.
-
To restore the VM without network connectivity, clear Connect to Network.
You might want to restore the VM without network connectivity, for example, if you are restoring the VM to a vCenter that does not have the original network. You can then verify the VM settings before connecting the VM to the network.
-
-
-
Click Run Restore.
If you are restoring from a safeset that has a potential threat, a warning message appears. To cancel the restore, click Cancel. To continue restoring the volume, click Continue.
The Process Details dialog box appears. When the VM is restored, the following Status message appears: Rapid VM restore is running.
The restored VM appears in the vSphere environment. You can access the VM and begin using it.
-
Do one or more of the following:
-
To close the Process Details dialog box, click Close in the dialog box. If you close the Process Details dialog box without canceling the Rapid VM Restore, the VM remains in the vSphere environment.
-
To reopen the Process Details dialog box, find the VM’s VRA backup job on the Computers page or Monitor page. Click the Rapid VM Restore symbol that appears beside the VRA job name:

-
To permanently restore the VM by migrating it to permanent storage, see Migrate a vSphere VM restored using Rapid VM Restore to permanent storage.
IMPORTANT: You cannot migrate the VM to permanent storage if the VRA is protecting a single ESXi host that is not managed by vCenter Server.
-
To remove the VM from the vSphere environment, click Cancel Rapid VM Restore in the Process Details dialog box.
-