Schedule a backup to run multiple times per day
Beginning with Windows Agent 8.90, Linux Agent 8.90, AIX Agent 9.00 and vSphere Recovery Agent (VRA) 9.11, when an agent is backing up data to a version 8.60 or later vault, you can schedule the backup job to run multiple times per day by creating an intra-daily schedule. You can create an intra-daily schedule for a Windows, Linux or AIX backup job using Portal 8.88 or later. You can create an intra-daily schedule for vSphere backup jobs beginning in Portal 9.20.
Note: Backup verification does not run for vSphere backups that are started by intra-daily schedules.
Note: To schedule a backup job to run on specific days of the week or month, see Schedule a backup.
Note: Beginning with Portal 9.30 and Windows Agent 9.30, Image and Local System backups can also be triggered by system events on supported Windows desktop operating systems. See Trigger backups when events occur on Windows desktop computers.
Each backup job can have one intra-daily schedule. If the job has other schedules, the intra-daily schedule has the lowest priority and is at the bottom of the schedule list. If a job is scheduled to start at exactly the same time by an intra-daily schedule and another schedule, the job only runs once and the retention type of the other schedule (e.g., daily or monthly) is applied to the resulting safeset.
When you create an intra-daily schedule for a backup job, you can choose one of two retention types:
-
24-Hours. With this retention type, each backup is kept for at least 24 hours and at least one backup with this retention type is stored online.
-
48-Hours. With this retention type, each backup is kept for at least 48 hours and at least one backup with this retention type is stored online.
Other retention types are not available for intra-daily schedules. You cannot add, change or delete retention types for intra-daily schedules.
When you schedule a backup, the View/Add Schedule dialog box shows the maximum number of restore points that could result from the job's current schedules and retention types. You can then change your schedules, if required. See Maximum number of restore points for a job.
To reduce schedule overloads, backups that are scheduled by intra-daily schedules are skipped in some cases. See Skipped backups.
To schedule a backup job to run multiple times per day:
-
Do one of the following:
-
On the navigation bar, click Computers. Find the computer with the backup job that you want to schedule, and click the row to expand its view. On the Jobs tab, find the job that you want to schedule. In its Select Action menu, click View/Add Schedule.
-
Create a new backup job. The View/Add Schedule dialog box appears when you save the job.
-
-
In the View/Add Schedule dialog box, click Add Schedule.
A new row appears in the dialog box.
-
In the new schedule row, click the arrow in the Schedule box.
IMPORTANT: To create an intra-daily schedule, you must select Intra-daily in the Schedule box before selecting a retention type.
-
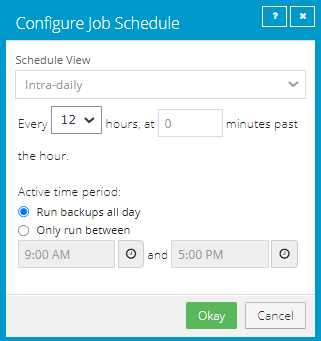
In the Configure Job Schedule dialog box, do the following:
-
In the Schedule View list, select Intra-daily.
-
In the Every x hours list, click the frequency for running the job. You can schedule the job to run every 1, 2, 3, 4, 6, 8 or 12 hours.
-
In the at y minutes past the hour box, type the number of minutes after the hour when you want to run the job. For example, enter 15 to run the job at 15 minutes past each hour when the job runs.
-
In the Active time period area, do one of the following:
-
To run the job at the specified frequency for the full 24 hour period, click Run backups all day.
-
To run the job according to the intra-daily schedule for only part of each 24-hour day period, click Only run between. Click the first clock icon and specify the start of the time period for running backups at the specified frequency. Click the second clock icon and specify the end of the time period for running backups at the specified frequency.
-
-
Click Okay.
If the job has other schedules, the intra-daily schedule appears at the bottom of the schedule list and has the lowest priority. The priority of the intra-daily backup schedule cannot be changed.
-
-
In the Retention list, click one of the following retention types:
-
24-Hours. With this retention type, each backup is kept for at least 24 hours and at least one backup with this retention type is stored online.
-
48-Hours. With this retention type, each backup is kept for at least 48 hours and at least one backup with this retention type is stored online.
Other retention types are not available for intra-daily schedules.
-
-
If the schedule is for a SQL Server Plug-in database backup job, do one of the following in the Backup Type list:
-
To back up each database from the point in time when the backup starts, click Full.
-
To back up each database and its transaction logs from the point in time when the backup starts, click Full with transaction logs.
-
To back up the database transaction logs only from the point in time when the backup starts, click Transaction logs only. When Transaction Logs only is selected, the entire database and its transaction logs will be backed up when the job first runs. In subsequent backups, only the transaction logs will be backed up.
Note: After a transaction log backup, logs are marked for truncation. If you also back up databases using another tool (e.g., native SQL Server backup), be sure that only one tool is being used for truncating logs.
Note: Transaction logs can only be backed up for databases that use the full or bulk-logged recovery model.
-
-
If the schedule is for an Image Plug-in job that backs up volumes with SQL Server database files, do one of the following in the SQL Application Settings list:
- To truncate database transaction logs after the backup, select Truncate transaction logs.
-
To run the backup without truncating logs, clear Truncate transaction logs.
Note: If you also back up databases using another tool (e.g., native SQL Server backup), use only one tool for truncating logs.
-
If the schedule is for an Exchange database backup job, do the following:
-
In the Backup Type list, do one of the following:
-
To only back up transaction logs and the checkpoint file after the first “seed” backup, click Incremental.
-
To back up the database files, checkpoint file and transaction logs, click Full.
-
-
To validate Exchange data during the backup, select Validate Exchange database.
-
-
In the Schedule box, click the arrow.
The Configure Job Schedule dialog box opens.
-
Click Okay.
The new schedule appears in the Schedule box.
-
In the Compression list, click a compression level for the backup data. Compression levels optimize the amount of data stored vs. the backup speed.
For descriptions of compression level options, see Policy compression and log settings.
-
Do one of the following:
-
To allow the backup job to run without a time limit, click None in the Deferring list.
-
To specify a maximum amount of time that the backup job can run, click Minutes or Hours in the Deferring list. In the adjacent box, type the maximum number of minutes or hours that the job can run.
Note: When deferring is used, the backup job does not back up any new data after the specified amount of time, even if some data is not backed up. Changes to data that was previously backed up will be backed up, regardless of the amount of time specified. For deferral behavior for specific backup types, see Run and schedule backups, synchronizations and custom commands.
Note: Incremental backups for Exchange cannot be deferred, even if deferring is enabled. Deferring can be applied to full backups for Exchange.
-
-
To run the job on the specified schedule, select the Enable check box near the end of the row.
-
Check the number of restore points that could result from the job's schedules and retention policies. If you want to increase or decrease the number of restore points, change the schedules or retention types.
The maximum number of restore points appears below the schedules in the View/Add Schedule dialog box. For more information, see Maximum number of restore points for a job.
-
In the Automatic Retry for Scheduled Backups section at the bottom of the View / Add Schedule dialog box, specify whether scheduled backups should retry after a failed backup. See Specify whether scheduled backups retry after a failure.
-
If a Windows Event Backup Triggers section is available in the View / Add Schedule dialog box, you might be able to create a Windows event backup trigger. When a backup job has a trigger, the job runs automatically when a user logs on to the computer or the computer starts to shut down. See Trigger backups when events occur on Windows desktop computers.
-
Click Save.