Restore an entire Windows computer
You can restore an entire Windows computer from a Bare Metal Restore (BMR) backup. Portal can automatically create BMR backup jobs for 64-bit Windows computers. See Set up backups for a computer.
To restore an entire Windows computer, you must:
Prepare recovery media
Before you can restore an entire Windows computer, you must prepare recovery media on a USB flash drive.
To prepare recovery media:
-
Plug a USB flash drive into the USB port of a Windows computer.
-
In a web browser on the computer, go to the Portal website and sign in.
-
In the Tools section on the Dashboard, click Download recovery media.
-
When the executable file is downloaded, open and run the executable file.
-
If you are prompted to install the Windows Assessment and Deployment Kit (ADK), click Download to download the Windows ADK installer from Microsoft, and then run the installation. Select the Deployment Tools option on the feature selection page.
-
If you are prompted to install the WinPE add-on for Windows ADK, click Download to download the WinPE add-on from Microsoft, and then run the installation.
-
Click Continue.
-
On the Select the Recovery Media Destination page, select USB Flash Drive and choose a USB flash drive from the list.
To add a flash drive to the list, insert the flash drive into a USB port, and click Refresh when it is ready.
-
Click Continue.
When finished, a message states that your recovery media is ready.
-
Click Close.
Restore a Windows computer using recovery media
After you prepare recovery media, you can restore an entire Windows computer from a BMR backup.
To restore a Windows computer using recovery media:
-
Choose a destination machine where you will restore the computer.
You can restore the computer to the machine where it was backed up, or to a different machine.
-
With the destination machine turned off, insert the recovery media USB flash drive into a USB port on the machine.
-
Start the destination machine. When prompted to do so, press any key.
If you are not asked to press a key and the System Restore page does not appear, you might need to change your computer’s startup settings. See your hardware documentation.
-
On the System Restore page, specify the time zone and keyboard, and then click Next.
This time zone is used for showing backup start times during the restore process. The restored machine will have the time zone of the system that was backed up.
-
On the License Agreement page, read the license agreement. Select I accept the terms and conditions in the license agreement, and then click Next.
-
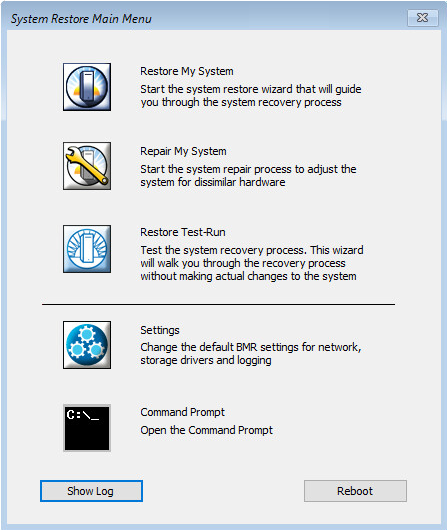
On the Main Menu page, click Restore My System.
The restore wizard lists steps in the restore process.
-
Click Next.
-
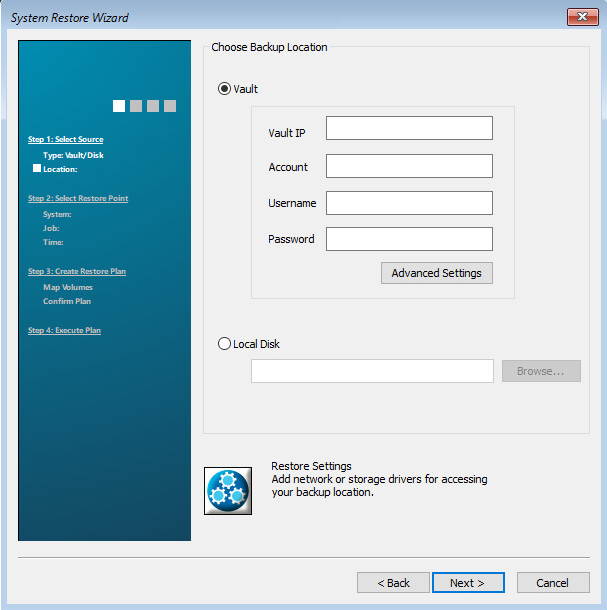
On the Choose Backup Location page, select Vault. Specify the IP address of the vault, and the vault account, username and password used for the backup.
To obtain vault information, please contact Support.
-
Click Next.
-
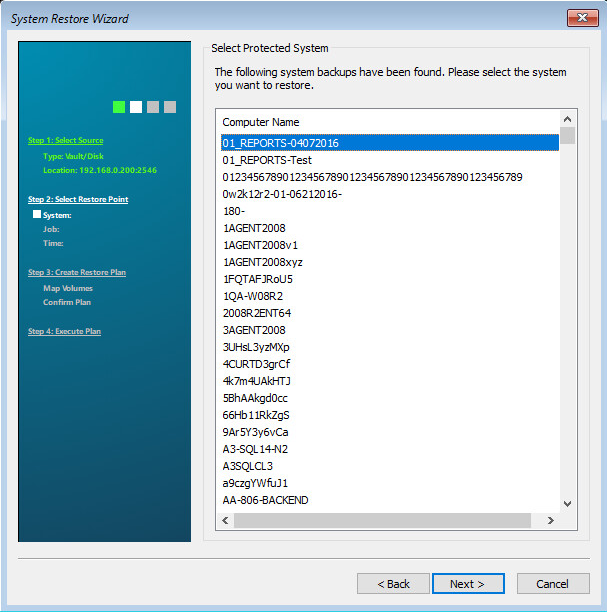
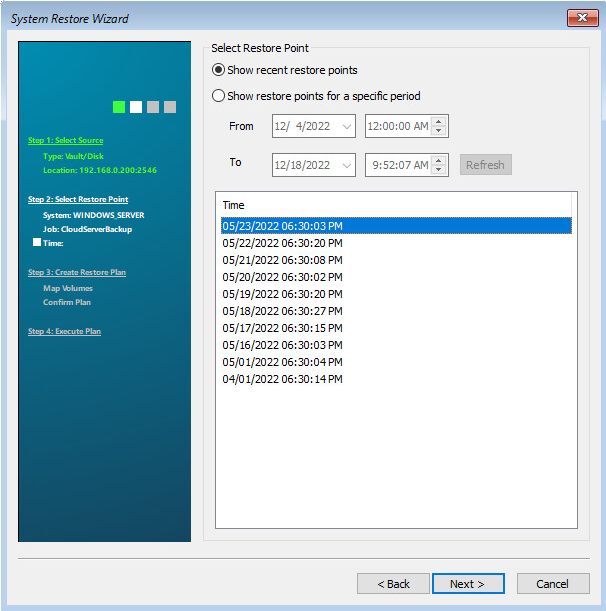
On the Select Protected System page, click the protected system that you want to restore, and then click Next.
-
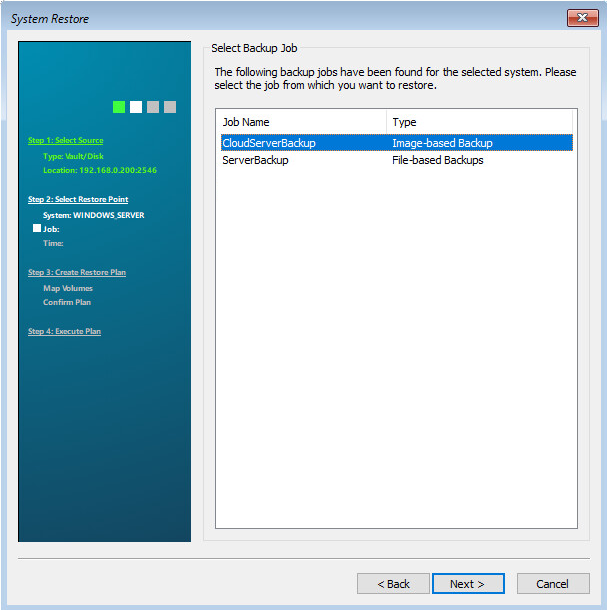
On the Select Backup Job page, click the backup job from which you want to restore, and then click Next.
-
On the Select Restore Point page, click the start date and time of the backup that you want to restore, and then click Next.
Restore points are shown in the time zone selected in Step 2.
-
In the Password dialog box, enter the encryption password for the backup, and then click OK.
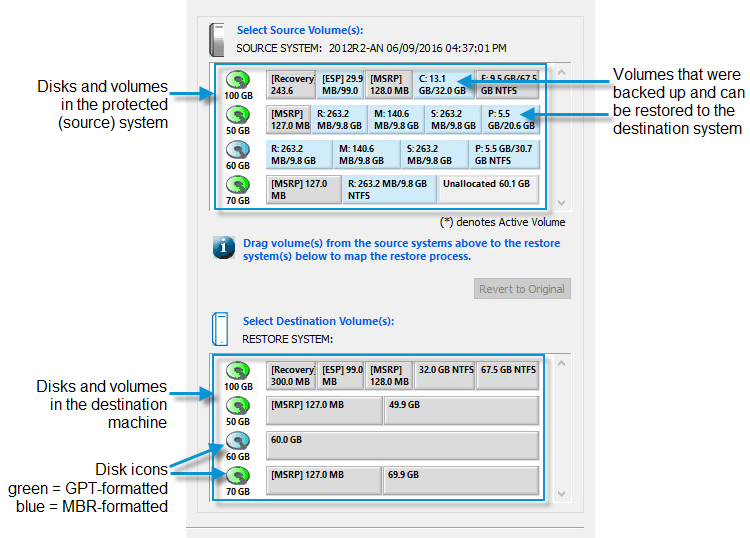
The Select Source and Destination Volumes page appears. This page shows rectangles that represent disks and volumes in the protected (source) system and in the destination machine. Blue rectangles represent volumes that were backed up and can be restored.
You can create a restore plan on this page. A restore plan shows which volumes from the backup to restore to the destination machine.
-
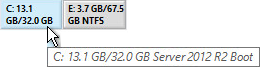
To view the entire label for a volume, point to the volume rectangle. The label appears in a tooltip.
-
Do one or more of the following until the Select Destination Volumes area shows the volumes that you want to restore to the destination machine:
-
To delete a volume from the destination machine to make room for other volumes, right-click the volume rectangle, and click Delete Volume.
-
To change the format of a disk in the destination machine, right-click the disk icon and choose Convert to GPT disk or Convert to MBR disk.
-
If the backed up (source) system has an ESP volume (represented by a rectangle with an "ESP" label
 ):
): -
Drag the ESP volume from the source system to the start of a GPT-formatted disk in the destination machine.
If a message states that an EFI partition can only be restored to a UEFI system, you cannot restore the selected computer to the destination machine.
-
Drag the “Boot” volume from the source system to the right of the ESP volume in the destination machine.
-
Drag other volume rectangles that you want to restore, if any, from the source system to the destination machine.
Note: The destination disk must be the same size or larger than the volume you want to restore.
-
-
If the backed up (source) system has a System volume (represented by a rectangle with a "System" label
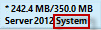 ):
):-
Drag the Boot volume (represented by a rectangle with the "Boot" label
 ) from the source system to the start of a GPT-formatted disk in the destination machine.
If an ESP volume is created automatically in the destination machine, you do not need to restore the System volume.
-
If an ESP volume is not created automatically, drag the System volume to the right of the Boot volume.
If a message states that the volume is an OEM volume, delete the Boot volume from the destination machine disk. Drag the System volume to the start of the destination machine disk, and then drag the Boot volume to the right of the System volume.
-
Drag other volumes that you want to restore, if any, from the source system to the destination machine.
-
- To revert disks in the destination machine to their original state, click Revert to Original.
-
-
Click Next.
The Restore Plan Summary page lists changes that will be made in the destination machine if you run the restore.
-
Review the restore plan. If you are satisfied with the restore plan, select Click here to confirm the restore plan, and then click Next.
The restore begins. A message appears when the restore is finished.
-
Click OK in the message box, and then click Next.
-
Do one of the following:
-
If the restore was successful and you want to start the restored system, select Reboot the system. Click Finish.
-
If the system was successfully restored but the destination machine hardware is significantly different than the original machine, click Next to proceed to the repair wizard. In the repair wizard, click Repair OS and Repair All Drivers, and then start the restored system.
-
If the restore failed, exit from the wizard.
Note: A restore must finish within 72 hours, or it will fail.
-