Create and edit custom job templates
Admin users in parent sites can create and edit custom job templates for automatically configuring agents in child sites that they manage.
Before a parent site Admin user can create a custom job template, at least one global job template must be created in Portal. Global job templates are created by Super users and are available for all sites in a Portal instance. See Create job templates.
To create or edit a custom job template:
-
When signed in as an Admin user who can manage child sites, click Sites on the navigation bar.
-
Open a child site record by clicking its row.
Note: If you cannot open the site record, the Allow admins to manage child sites check box might not be selected in the parent site.
-
Click the Agent Auto Configuration tab for the site. See Enable agent auto-configuration in child sites.
-
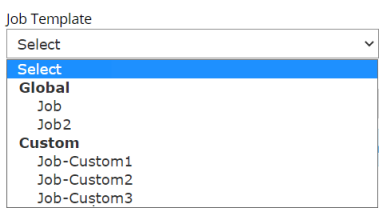
Click the Job Template list.
The Job Template list includes any global templates (available for all Portal child sites) and custom templates (available for child sites in the parent site).
- Do one of the following:
To create a custom job template based on a Global template, select the Global template in the Job Template list, and then click View. The job template appears. Click Create a Copy (Editable). An editable copy of the template appears.
To edit a custom job template, select the custom template in the Job Template list and then click Edit. The editable template appears.
To create a custom job template based on an existing custom template, select a custom template in the Job Template list and then click Edit. An editable copy of the template appears.
-
In the Select Job Type list, do one of the following:
-
To create a template for configuring Image backup jobs on Windows servers, select Image.
-
To create a template for configuring Local System backup jobs on Windows servers, select Local System.
-
-
In the Job Name box, type a name for the template. This name will be used for any job that is automatically configured using the template.
-
(Optional) In the Job Description box, type a description for the template. This description will be used for any job that is automatically configured using the template.
-
To back up all volumes on the system, including non-removable volumes that are added after the backup job is created, select the Protect Entire Server option.
The Protect Entire Server option is selected by default for Image backup templates.
-
To back up volumes that are needed to boot up the system after a system recovery, select the Bare Metal Restore option.
The Bare Metal Restore option is automatically selected when you select the Protect Entire Server option, and is always selected for Image backup job templates. This ensures that a protected server can be restored using the System Restore application, if required.
-
(Optional) If you are creating a template for Local System backup jobs, do one or more of the following until the Backup Set box shows the drives and folders that you want to include and exclude in the backup job:
-
To include specific folders or drives in the backups, enter the folder or drive name (e.g., C:\) in the Enter Folders/Drives box, and then click Include.
Note: If the Protect Entire Server option is selected, you cannot include specific folders or drives.
-
To exclude specific folders or drives from the backups, enter the folder or drive name (e.g., D:\test) in the Enter Folders/Drives box, and then click Exclude.
-
To remove a row from the Backup Set box, click the Delete button
 in the row.
-
-
Do one of the following:
-
To specify that scheduled backups should retry after failed backup attempts, select the Retry failed backup option. In the Number of retries box, enter the number of times that the backup should try again. In the Retry wait time in minutes box, enter the number of minutes before each retry attempt.
-
To specify that scheduled backups should not retry after failed backup attempts, clear the Retry failed backup check box.
-
-
Do one of the following:
-
To check for potential ransomware threats when running a job that is configured using the template, select the Enable Threat Detection check box.
-
To disable ransomware threat detection in a job that is configured using the template, clear the Enable Threat Detection check box.
-
-
In the Schedules pane, do the following:
-
In the Retention list, click a retention type.
The retention type specifies the number of days a backup is kept on the vault, how many copies of a backup are stored online, and how long backup data is stored offline.
-
In the Schedule list, do one of the following:
Note: You cannot create an intra-daily schedule in a job template.
-
To run the backup on specific days each week, select Days of Week in the Schedule View list. Select the days when you want to run the job.
When an agent is auto-configured using this template, the backup will be scheduled at a randomly-assigned time on the selected days of the week. If multiple Days of Week and Days of Month schedules are specified in the template, they will each be scheduled at the same randomly-assigned time. By default, the time will be between 8 PM and 8 AM in the time zone of the Windows server. A different time window might be specified in your Portal instance.
-
To run the backup on specific dates each month, select Days of Month in the Schedule View list. On the calendar, select the dates when you want to run the job.
When an agent is auto-configured using this template, the backup will be scheduled at a randomly-assigned time on the selected days of the month. If multiple Days of Week and Days of Month schedules are specified in the template, they will each be scheduled at the same randomly-assigned time. By default, the time will be between 8 PM and 8 AM in the time zone of the Windows server. A different time window might be specified in your Portal instance.
-
To create a custom schedule, select Custom in the Schedule View list. In the Custom Cycle dialog box, enter a custom schedule. Be sure to follow the format and notation as described.
When an agent is auto-configured using this template, the backup will be scheduled at the time specified in the custom schedule (not at a randomly-assigned time).
-
-
In the Compression list, click a compression level for the backup data. Compression levels optimize the volume of data sent against the speed of processing.
-
Do one of the following:
-
To allow the backup job to run without a time limit, click None in the Deferring list.
-
To specify a maximum amount of time that the backup job can run, click Minutes or Hours in the Deferring list. In the adjacent box, type the maximum number of minutes or hours that the job can run.
When deferring is used, the backup job does not back up any new data after the specified amount of time, even if some data is not backed up. Changes to data that was previously backed up will be backed up, regardless of the amount of time specified.
-
-
-
To add another schedule to the template, click Add schedule and then repeat Step 11 for the new schedule row.
-
If there is more than one schedule row, use the Priority arrows to change the order of the schedule rows.
If the job is scheduled to start at exactly the same time by multiple schedules, the job only runs once at the scheduled time. If the jobs have different retention types, the retention type of the schedule that is highest in the list is applied to the resulting safeset.
-
To remove a schedule from the template, click the Delete button
in the schedule row. - Click Save.