Restore a Hyper-V VM within minutes using Rapid VM Restore
Using Rapid VM Restore, you can restore a virtual machine (VM) to your Hyper-V environment within minutes. You can only restore one VM at a time using this restore method.
When you first restore a Hyper-V VM using Rapid VM Restore, disks from the protected VM are mounted on a temporary VM for immediate access. While the VM runs, changes are written to a temporary storage location. At this stage, the VM requires a running Rapid VM Restore process and connections to the Hyper-V Agent and vault, and is intended for temporary use.
You can restore the VM permanently by migrating it to a permanent storage location using Portal. After a VM is migrated, the VM does not require a running Rapid VM Restore process and is independent from the Hyper-V Agent and vault. See Migrate a Hyper-V VM restored using Rapid VM Restore to permanent storage.
We recommend migrating a VM to permanent storage as soon as possible after it is restored using Rapid VM Restore. If the network connection to the Hyper-V Agent, vault or destination host is interrupted before a VM is migrated to permanent storage, VM data could be lost.
Notes:
-
A Hyper-V VM restored using Rapid VM Restore cannot be backed up until it is migrated to permanent storage. If you try to back up the restored VM before it is migrated to permanent storage, the following error occurs: Unable to backup virtual machine "VMname" [VMID] because it is in RVMR state. The VM's backup status in Portal is Failed.
-
When you first restore a VM using Rapid VM Restore, it runs on the host that you select during the restore process. The VM could be lost if it is migrated to another host in a Hyper-V cluster. For this reason:
-
High availability is not enabled for a VM that is running using Rapid VM Restore. If high availability was enabled for the VM when it was backed up, high availability will be enabled for the VM after it is migrated to permanent storage using Portal. See Migrate a Hyper-V VM restored using Rapid VM Restore to permanent storage.
-
Do not enable high availability on a VM that is running using Rapid VM Restore.
-
Only use Portal to migrate a VM that is running using Rapid VM Restore. Do not migrate the VM to another host in a cluster using Hyper-V Manager.
-
-
Rapid VM Restore is available with Hyper-V Agent version 9.0 or later.
To restore a Hyper-V VM within minutes using Rapid VM Restore:
-
On the navigation bar, click Computers.
A grid lists available computers.
-
Find the Hyper-V environment with the VM that you want to restore, and expand the environment view by clicking the row.
-
Click the Virtual Machines tab.
The Virtual Machines tab shows all VMs in the Hyper-V environment.
-
In the Current Inventory/Protected Inventory filter, click Protected Inventory.
The Virtual Machines tab shows VMs that have been backed up.
-
Find the VM that you want to restore, and click Restore in the job's Select Action menu.
-
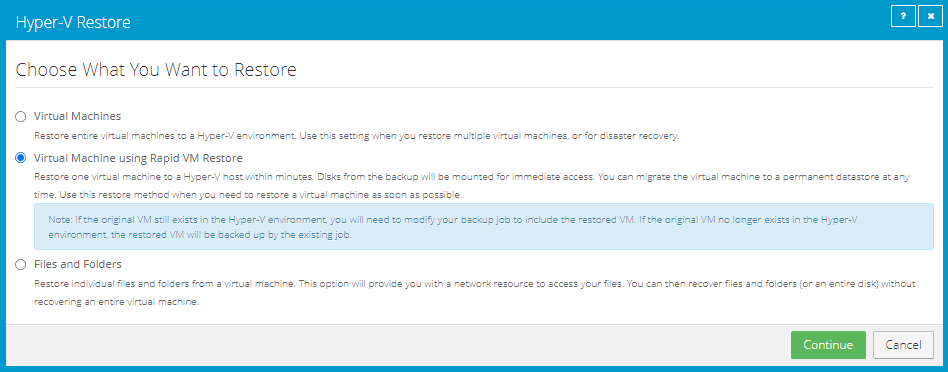
In the Choose What You Want to Restore dialog box, select Virtual Machine using Rapid VM Restore.
If the Virtual Machine using Rapid VM Restore option does not appear, this restore method is not available. This can occur if Rapid VM Restore requirements are not met. For more information, see Hyper-V Rapid VM Restore requirements.
-
Click Continue.
The Hyper-V Restore dialog box appears. The Select Backup Set box shows the most recent safeset for the VM on a vault that supports Rapid VM Restores. The VM to Restore box shows the VM that you are restoring.

-
To restore from an older safeset, click the Browse Safesets button.
 In the calendar that appears, click the date of the safeset from which you want to restore. In the safeset list to the right of the calendar, click the safeset from which you want to restore. The list only includes safesets on vaults that support Rapid VM Restores.
 -
In the Encryption Password box, enter the data encryption password. To view the password hint, click the Hint button.

-
In the Restore Settings box, do the following:
-
In the Restored VM Name box, type a name for the restored VM.
If you specify the name of a VM that already exists in the Hyper-V environment (e.g., the VM that was backed up), the restored VM will have the following name: VMname-rvmr-yyyy-Mon-dd--hh-mm-ss, where yyyy-Mon-dd--hh-mm-ss is the date and time when the VM was restored (e.g., VM-rvmr-2019-Nov-27--06-14-09).
-
In the Select Volume list, select a volume for writing changes while the VM is running using Rapid VM Restore but is not migrated to permanent storage. The amount of free space is shown for each volume in the list.
-
(Optional) In the Sub-Path box, type the folder path (e.g., RestoredVMs\VM 1) on the selected volume for writing changes while the VM is running using Rapid VM Restore.
If you do not specify a path, changes will be written to a folder with the name of the restored VM: VMname-rvmr-yyyy-Mon-dd--hh-mm-ss, where yyyy-Mon-dd--hh-mm-ss is the date and time when the VM was restored.
-
In the Destination Host list, select a host for running the restored VM.
- Do one of the following:
To restore the VM with its power on, select the Power on the VM option.
To restore the VM powered off, clear the Power on the VM option. Restoring a VM with the power off can be useful if you want to verify or change the VM settings before powering on the VM.
Note: If you are restoring a VM that still exists in the Hyper-V environment, power off the original VM before the restore to avoid conflicts between the original VM and the restored VM.
-
Do one of the following:
-
To connect the VM to the network, select Connect to Network.
-
To restore the VM without network connectivity, clear Connect to Network. Restoring a VM with the power off can be useful when restoring to a Hyper-V environment that does not have the original network. You can then verify the VM settings before connecting the VM to the network.
-
-
-
Click Run Restore.
The Process Details dialog box appears. When the VM is restored, the following Status message appears in the Process Details dialog box: Rapid VM restore is running.
Note: Record the Process ID of the restore. If the same VM is restored more than once concurrently using Rapid VM Restore, you can use the Process ID to identify the restored VM.
The restored VM appears in the Hyper-V environment. You can access the VM and begin using it.
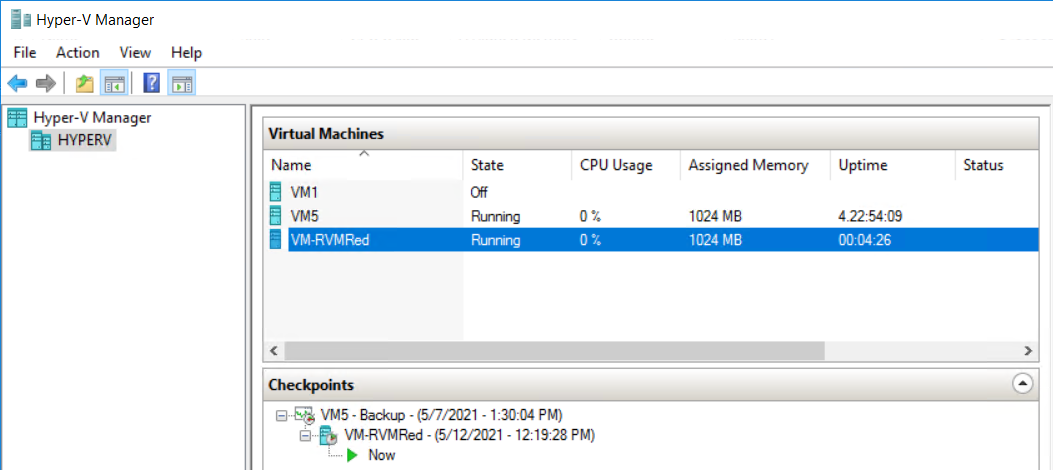
The restored VM also appears in the list of unprotected VMs on the Computers page in Portal. You can add the VM to a Hyper-V backup job but you cannot back it up until it has been migrated to permanent storage. See Migrate a Hyper-V VM restored using Rapid VM Restore to permanent storage.
-
Do one or more of the following:
-
To close the Process Details dialog box, click Close in the dialog box. If you close the Process Details dialog box without canceling the Rapid VM Restore, the VM remains in the Hyper-V environment.
-
To reopen the Process Details dialog box, find the VM you are restoring on the Virtual Machines tab of the Hyper-V environment on the Computers page. Click the Rapid VM Restore symbol that appears beside the VM name:

-
To permanently restore the VM by migrating it to permanent storage, see Migrate a Hyper-V VM restored using Rapid VM Restore to permanent storage.
-
To remove the VM from the Hyper-V environment, click Cancel Rapid VM Restore in the Process Details dialog box.
-