Restore files, folders and database items using a vSphere Recovery Agent
You can restore files and folders from protected Windows VMs using the vSphere Recovery Agent (VRA).
During a file and folder restore, volumes from the selected VM are mounted as drives on the machine where the VRA is running. You can then:
-
Share some or all of the mounted drives so that users can access files and folders from other machines.
-
Sign in to the VRA machine and copy files and folders from the mounted drives.
Note: Files and folders on the mounted drives will be accessible to anyone on the VRA system, including non-Admin users. If you are concerned about security, secure the Agent machine and prevent users from logging in to the machine locally.
In addition to copying files and folders from the mounted drives, you can find and restore items from Exchange and SQL Server databases. Using the Granular Restore for Microsoft Exchange and SQL application, you can restore Exchange mailboxes and messages to PST files or live databases, export SQL Server database items to live databases, and export SQL Server database items as SQL scripts. For more information, see the Granular Restore for Microsoft Exchange and SQL User Guide.
Note: You cannot restore specific files and folders from disks that are encrypted using Bitlocker or from Linux VMs.
To restore files, folders and database items using a vSphere Recovery Agent:
-
On the navigation bar, click Computers.
A grid lists available computers.
-
Find the vSphere environment with the VM that you want to restore, and expand its view by clicking the row.
-
Click the Jobs tab.
-
Find the backup job with the VM that you want to restore, and click Restore in the job’s Select Action menu.
-
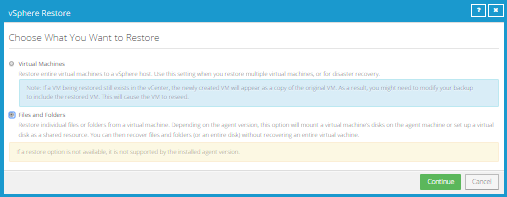
In the Choose What You Want to Restore dialog box, select Files and Folders.
-
Click Continue.
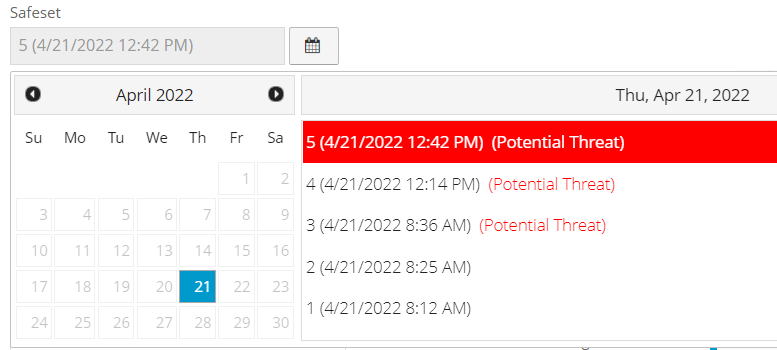
The Restore dialog box appears. If a potential ransomware threat was not detected when running the backup job, the most recent safeset for the job appears in the Safeset box.
If a potential ransomware threat was detected when running the backup job, a calendar with a list of safesets appears. "Potential Threat" appears beside each safeset where a potential ransomware threat was detected.
Note: If you are restoring data as described in Restore data to a replacement computer or Restore data from another computer, "Potential Threat" does not appear for any safesets even if a potential threat was detected during a backup in the original vSphere environment.
-
To restore from an older safeset, if a calendar with a list of backups does not already appear, click the Browse Safesets button.
 In the calendar, click the date of the safeset from which you want to restore. To the right of the calendar, click the specific safeset from which you want to restore.
 -
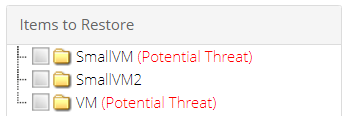
In the Items to Restore box, select the check box for the VM with files or folders that you want to restore.
If a potential ransomware threat was detected on a VM, "Potential Threat" appears beside the VM name.
-
In the Encryption Password box, enter the data encryption password. To view the password hint, click the Hint button.
-
In the Idle Time box, enter the number of minutes of inactivity after which the shared drive will automatically unshare. The Idle time can range from 2 to 180 minutes.
Note: The drive will not unshare as long as new data is being copied. If you copy the same data from a shared drive more than once, the system could time out because no new data is being read.
-
To use all available bandwidth for the restore, select Use all available bandwidth.
To ensure the best possible performance for your restore, we recommend selecting Use all available bandwidth.
-
Click Run Restore.
If you are restoring from a safeset that has a potential threat, a warning message appears. To cancel the restore, click Cancel. To continue restoring the volume, click Continue.
Volumes from the selected VM are mapped as drives on the machine where the VRA is running, and are available in a RestoreMount folder on the VRA machine.
-
(Optional) To allow access to the backup data from other servers, do one of the following on the machine where the VRA is running:
-
Share one or more of the mapped drives.
-
Share one or more directories from the RestoreMount folder.
-
-
Do one or both of the following:
-
Copy files and folders that you want to restore from the mapped drives or shares.
-
Use the Granular Restore for Microsoft Exchange and SQL application to find and restore items from Exchange and SQL Server database backups on the mapped drives or shares. You can restore Exchange mailboxes and messages to PST files or live databases, export SQL Server database items to live databases, and export SQL Server database items as SQL scripts. See the Granular Restore for Microsoft Exchange and SQL User Guide.
-