Restore vSphere VMs
Before you restore a vSphere VM, the vSphere Recovery Agent (VRA) checks whether sufficient storage space is available. If there is not enough space, the restore fails and a message appears in the log file.
If you restore a VM or template to a vSphere environment and the original VM is present, the VM will be restored as a clone of the original with the following name: <VMname>-vra-restored-<Date>. This name will appear for the clone in both the vCenter environment and the datastore. The VM will be restored as a clone whether the original VM is powered on, off, or suspended. The original VM name will not change and its data will not be overwritten. Beginning with VRA 8.87, the restored VM is assigned a new MAC address. An IP address conflict will not occur when the original and newly-restored VMs are powered on.
After you restore a VM from a crash-consistent backup, the VM may perform a disk check when it first starts.
To restore vSphere VMs:
-
On the navigation bar, click Computers.
A grid lists available computers.
-
Find the vSphere environment with the VM that you want to restore, and expand its view by clicking the row.
-
Click the Jobs tab.
-
Find the backup job with the VM that you want to restore, and click Restore in the job’s Select Action menu.
-
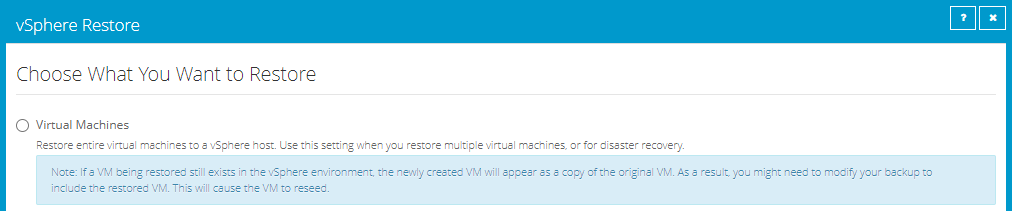
In the Choose What You Want to Restore dialog box, select Virtual Machines.
-
Click Continue.
The Restore dialog box appears. If a potential ransomware threat was not detected in the job, the most recent safeset for the job appears in the Safeset box.
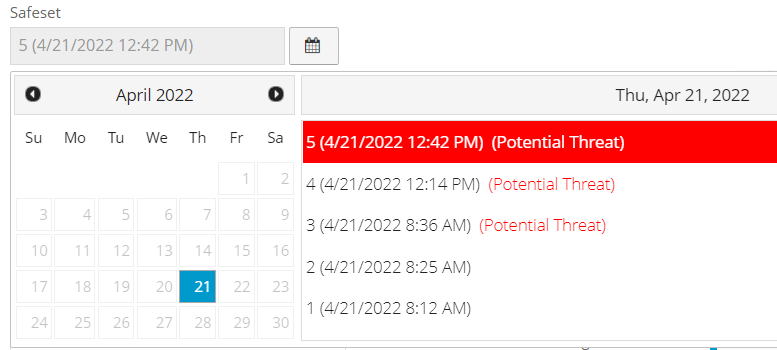
If a potential ransomware threat was detected when running the job, a calendar with a list of safesets appears. "Potential Threat" appears beside each safeset where a potential ransomware threat was detected.
Note: If you are restoring data as described in Restore data to a replacement computer or Restore data from another computer, "Potential Threat" does not appear for any safesets even if a potential threat was detected during a backup in the original vSphere environment.
-
To restore data from an older safeset, or from SSI (safeset image) files on disk, do one of the following:
-
To restore from an older safeset, if a calendar with a list of backups does not already appear, click the Browse Safesets button.
 In the calendar, click the date of the safeset from which you want to restore. To the right of the calendar, click the specific safeset from which you want to restore.
 -
To restore data from SSI (safeset image) files on disk, select Directory on disk from the Source Device list. Click the folder button.
 In the Select Folder dialog box, select the directory where the files are located, and click Okay.
SSI files are full backups exported from the vault or backed up to disk instead of to a vault. It can be quicker to save backup files on physical media and transport them to a location for a restore, than to restore data from a vault in a remote datacenter.
Note: If SSI files were created by a backup to a directory on disk, you cannot restore from the SSI files until they have been imported into the vault and you have synchronized the Agent with the vault.
-
-
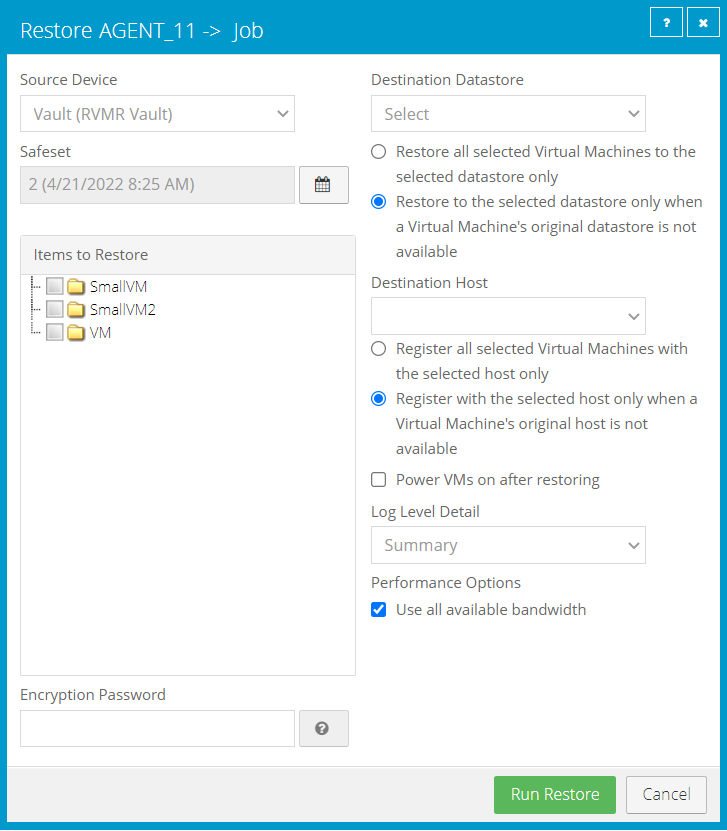
In the Items to Restore box, select the check box for each VM that you want to restore.
If a VM has a potential ransomware threat, "Potential Threat" appears beside the VM name.

-
In the Encryption Password box, enter the data encryption password. To view the password hint, click the Hint button.

-
In the Destination Datastore list, click the datastore for the restored VMs.
-
Select one of the following options for restoring VMs to the selected datastore:
-
Restore all selected Virtual Machines to the selected datastore only
-
Restore to the selected datastore only when a Virtual Machine’s original datastore is not available. If the backed-up VM contains multiple VMDKs that resided on two or more datastores, and one or more of the datastores is unavailable, the entire VM will be restored to the selected datastore.
-
-
In the Destination Host list, click the host where you want to register the VMs.
The list only shows hosts that have access to the selected datastore. If only one ESXi host is available, it is populated as the Destination host when you select a datastore.
-
If the VRA is protecting a vCenter Server, select one of the following options for registering restored VMs with the selected host:
-
Register all selected Virtual Machines with the selected host only
-
Register with the selected host only when a Virtual Machine’s original host is not available
Note: If the VRA is protecting a single ESXi host that is not managed by vCenter Server, registration options do not appear in the Restore dialog box.
-
-
To power on the VMs after they are restored, select Power VMs on after restoring.
-
In the Log Level Detail list, click the logging level. See Advanced restore options.
-
To use all available bandwidth for the restore, select Use all available bandwidth.
To ensure the best possible performance for your restore, we recommend selecting Use all available bandwidth.
-
Click Run Restore.
If you are restoring from a safeset that has a potential threat, a warning message appears. To cancel the restore, click Cancel. To continue restoring the volume, click Continue.