Restore Hyper-V files, folders and database items
During a file and folder restore, volumes from a protected VM are mounted in a RestoreMount folder on the server where the Management service is running. The folder is shared, and a UNC path to the share is provided in Portal. You can then access the share from a VM or server with network access to the server, and copy files and folders that you want to restore from the protected VM.
To restore files and folders from Windows VMs, the Hyper-V Agent Management service must be installed on the same Windows version or a later version than is installed on the Windows VMs. For example, to restore files and folders from Windows Server 2019 VMs, the Hyper-V Agent Management service must be installed on Windows Server 2019 or later.
You can select multiple VMs in a single file and folder restore. When you restore files and folders from multiple VMs, a separate UNC path is provided in Portal for each VM.
Note: To access a UNC share during a file and folder restore, you must provide credentials for a user with admin access to the server where the Management service is running.
In addition to copying files and folders from a protected VM, you can find and restore items from Exchange and SQL Server databases. Using the Granular Restore for Microsoft Exchange and SQL application, you can restore Exchange mailboxes and messages to PST files or live databases, export SQL Server database items to live databases, and export SQL Server database items as SQL scripts. For more information, see the Granular Restore for Microsoft Exchange and SQL User Guide.
Note: You cannot restore files, folders and database items from Linux VMs in Hyper-V environments.
To restore Hyper-V files, folders and database items:
-
On the navigation bar, click Computers.
A grid lists available computers.
-
Find the Hyper-V environment with the VM that you want to restore, and expand the environment view by clicking the row.
-
Click the Virtual Machines tab.
The Virtual Machines tab shows all VMs in the Hyper-V environment.

-
In the Current Inventory/Protected Inventory filter, click Protected Inventory.
The Virtual Machines tab shows VMs that have been backed up.
-
Do one of the following:
-
To restore files and folders from one VM, click Restore in its Select Action menu.
-
To restore files and folders from one or more VMs, select the check box for each VM, and then click Restore Hyper-V Job.

-
-
In the Choose What You Want to Restore dialog box, select Files and Folders.
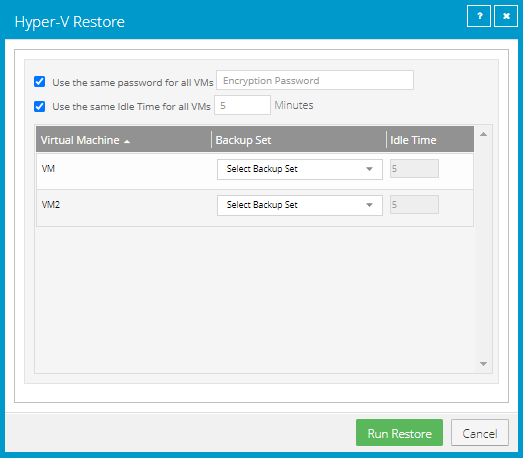
The Hyper-V Restore dialog box shows the VM or VMs from which you want to restore files and folders. If you are restoring files and folders from multiple VMs, encryption password and idle time options appear at the top of the dialog box.
If you are restoring files and folders from one VM, go to Step 9.
-
If you are restoring files and folders from multiple VMs, do one of the following:
-
If the VMs are protected with the same encryption password, select the Use the same password for all VMs check box. In the Encryption Password box, enter the data encryption password.
-
If the VMs are protected by jobs with different encryption passwords, clear the Use the same password for all VMs check box.
-
-
If you are restoring files and folders from multiple VMs, do one of the following:
-
To set the same idle time for each VM, select the Use the same Idle Time for all VMs check box. In the Idle Time box, enter the number of minutes of inactivity after which the shared drive will automatically unshare. The idle time value can be from 2 to 180 minutes.
Note: The drive will not unshare as long as new data is being copied. If you copy the same data from a shared drive more than once, the system could time out because no new data is being read.
- To set a different idle time for each VM, clear the Use the same Idle Time for all VMs check box. You can then set the idle time for each VM in Step 9.
-
-
For each VM from which you are restoring files and folders, do the following in the VM row:
-
In the Backup Set list, click the backup from which you want to restore. If you did not enter an encryption password for all VMs in Step 7, enter the password in the Encryption Password box. Click Apply.
-
If you did not specify an idle time for all VMs in Step 8, in the Idle Time box, enter the number of minutes of inactivity after which the shared drive will automatically unshare. The idle time value can be from 2 to 180 minutes.
Note: The drive will not unshare as long as new data is being copied. If you copy the same data from a shared drive more than once, the system could time out because no new data is being read.
-
-
Click Run Restore.
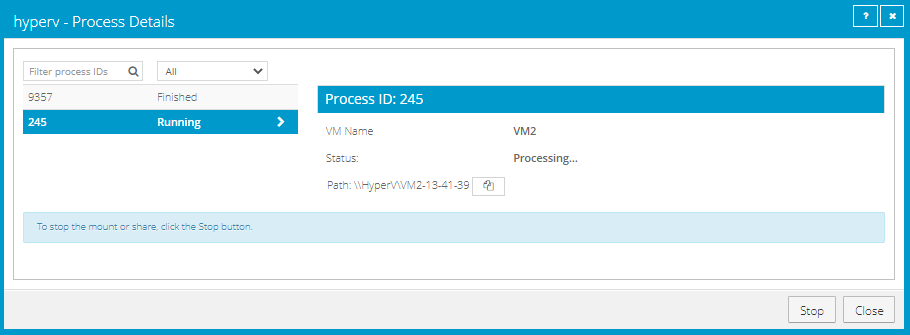
The Process Details dialog box shows the process status. If you are restoring files and folders from multiple VMs, a separate process appears for each VM. To view the process status for another VM, click the running process on the left side of the Process Details dialog box.
When VM volumes are shared, a UNC path to the share appears in the dialog box. The path is named //hostName/vmName-hh-mm-ss, where hh-mm-ss is the time when the share was created on the server where the Management service is running.
-
To copy the UNC path, click the Copy Path to Clipboard button
 .
.If you are restoring files and folders from multiple VMs, a different UNC path is provided for each VM. To obtain the UNC path for another VM, click the running process on the left side of the Process Details dialog box.
-
Use the UNC path on a VM or server with network access to the server where the Management service is running to do one or both of the following:
-
Access volumes from the protected VM, and copy files and folders that you want to restore.
IMPORTANT: To access the UNC share, you must provide credentials for a user with admin access to the server where the Management service is running.
-
Use the Granular Restore for Microsoft Exchange and SQL application to find and restore items from Exchange and SQL Server database backups in the mounted volumes. You can restore Exchange mailboxes and messages to PST files or live databases, export SQL Server database items to live databases, and export SQL Server database items as SQL scripts. See the Granular Restore for Microsoft Exchange and SQL User Guide.
-