Add a Windows cluster
To add a Windows failover cluster in Portal, install the Windows Agent and Cluster Support Plug-in on each node in the cluster. You can also install the Image Plug-in to back up Windows volumes as images, and install the SQL Server Plug-in to back up SQL Server databases.
When installing the Windows Agent and plug-ins on each cluster node, register the agent to Portal using the same user name and password. You can then sign in to Portal using these credentials and do the following:
-
Register a virtual server for the cluster core and for each cluster role (e.g., file server, SQL Server) that you want to protect.
-
Add the same vault setting for each virtual server.
-
Create and run backup jobs on each virtual server. When a backup job runs on a virtual server, the job is automatically directed to the active cluster node and will not reseed after a failover. You can also create backup jobs on the cluster nodes. Jobs on a cluster node will not fail over when the cluster fails over. See Add backup jobs for a Windows cluster.
Note: Agents with the Cluster Plug-in cannot be upgraded automatically. You must upgrade these agents by running the installation kit, to ensure that all nodes in a cluster have the same agent version.
To add a Windows cluster:
-
On each node in the Windows cluster, install the Windows Agent and the following plug-ins:
-
Cluster Support Plug-in
-
Image Plug-in (recommended)
-
SQL Server Plug-in (required for point-in-time database protection in a SQL Server cluster)
See Install the Windows Agent and plug-ins.
IMPORTANT: During the installation, register each agent to the same Portal instance using the same credentials.
We recommend specifying the Portal host name when you register an agent to Portal. If the Portal IP address changes in the future, DNS can handle the change and you will not have to manually register the agent to Portal again.
-
-
Sign in to Portal using the credentials that you used in Step 1.
-
In Portal, on the navigation bar, click Computers.
The Computers page shows the registered cluster nodes.

-
Find the active cluster node, and expand its view by clicking its row. Click Configure Manually.
-
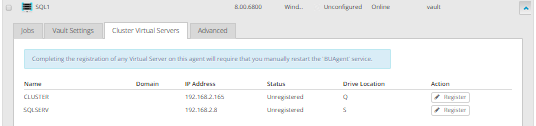
Click the Cluster Virtual Servers tab.
The tab lists the cluster core and each cluster resource (e.g., file server, SQL Server).
-
Click Register for the cluster core and for each role that you want to protect.
A virtual server appears on the Computers page for the registered cluster core and each registered role. Initially, each virtual server is Offline.
-
On each cluster node, restart the BUAgent service.
On the Computers page in Portal, each virtual server changes to Online.

-
In Portal, for each cluster node and virtual server, add the same vault setting. Each cluster node and virtual server must be registered to the same vault using the same credentials. See Add vault settings.
You can then create and run jobs on the virtual server, and the jobs will run after a failover. You can also create and run jobs on each cluster node. See Add backup jobs for a Windows cluster.